
Creating a tactile collage is a journey of self-expression, where every layer tells a part of your story. It’s more than assembling papers and fabrics; it’s about immersing yourself in textures, emotions, and memories.
Each element you choose carries significance, turning your artwork into a personal narrative rich with meaning. In this blog we will craft a tactile collage artwork using neutral and white-toned materials infused with raw textures and heartfelt elements.
We’ll delve into the emotional aspects of each step and suggest additional ideas to deepen your creative process. Let your intuition guide you as you embrace imperfections and connect with the materials—allowing your heart to lead the way.
Inspiration from Laly Mille.
1. Preparing the Base
Emotional Focus: Grounding & Letting Go
Process: Begin by applying Plaster of Paris bandage over a burlap base. Spread it evenly with water, ensuring both the plaster and burlap adhere well. Let it dry overnight to form a sturdy foundation for your collage.
Emotional Reflection: As you work with the plaster and burlap, think of grounding yourself. The tactile sensation of the materials symbolizes stability and the beginning of a new journey. Allow the drying process to represent letting go of control and trusting the natural progression of things.
Additional Ideas:
- Texture Play: Before the plaster dries, press textured items like lace, leaves, or stamps into it to create interesting patterns.
- Color Infusion: Mix natural pigments or tea into the plaster for subtle hues that evoke certain emotions.
- Embedded Keepsakes: Place small, flat objects like pressed flowers or handwritten notes into the plaster to embed personal memories into your base.

2. Gathering Collage Materials
Emotional Focus: Curating Meaningful Elements
Process: Collect neutral and white-toned papers and fabrics.


Mixed Media Artist Resource Library
Free printables, collage papers, creative prompts & how-to guides
I’ve put together a free resource library designed just for you, packed with everything you need to fuel your creativity. It’s my way of giving back to the mixed media community with resources to inspire your next project. Click here to join.
Buy papers:
- Printed tissue papers with neutral prints
- Neutral-colored wallpapers
- Natural fiber paper
- Mulberry paper
- Brown handmade paper
- Vintage collage sheets (printed or purchased)
- White or dyed doilies
- Rice paper

- Brown paper bags
- Brown tissue paper
- Brown corrugated cardboard
- Brown textured wrap paper
- Tea bag paper
- Vintage book pages
- Vintage ephemeras
- Vintage photos print outs
- Music sheets prints

- Embroidery on net
- Lace
- Gauge
- Gauge sealed with gel medium – clear
- Gauge sealed with gel medium & coffee
- White & beige fabrics
- Coffee dyed fabrics
- Jute
- Leaf skeleton
- Wire mesh

- Faux rice paper
- Handmade flower paper
- Glue gun texture on exam table paper & paint over
- Texture paper created with gesso / gel medium and sugar/ branches/ sand/ flower/ charcoal/ tea leaves
- 5. Textured paper created with gesso + pop + umber wash/coffee dye
- Brown momigami paper
- Write with white needle tip on vintage background color
- Brown tissue paper / tea bag paper texture on vintage papers, dictionary page
- Brown tissue paper / tea bag paper texture on neutral colored papers / gelli prints
- Coffee dyed paper
- Coffee dyed deli paper with stencils
- Coffee dyed tisuue papers
- White mark making on brown paper
- Neutral painted masking tape

Additional Ideas:
- Personal Artifacts: Include scraps from personal letters, old journals, or clothing that hold sentimental value.
- Nature’s Touch: Incorporate natural elements like dried flowers, leaves, or feathers to symbolize growth and change.
- Color Variations: While focusing on neutrals, consider subtle hints of soft colors that carry specific meanings for you.

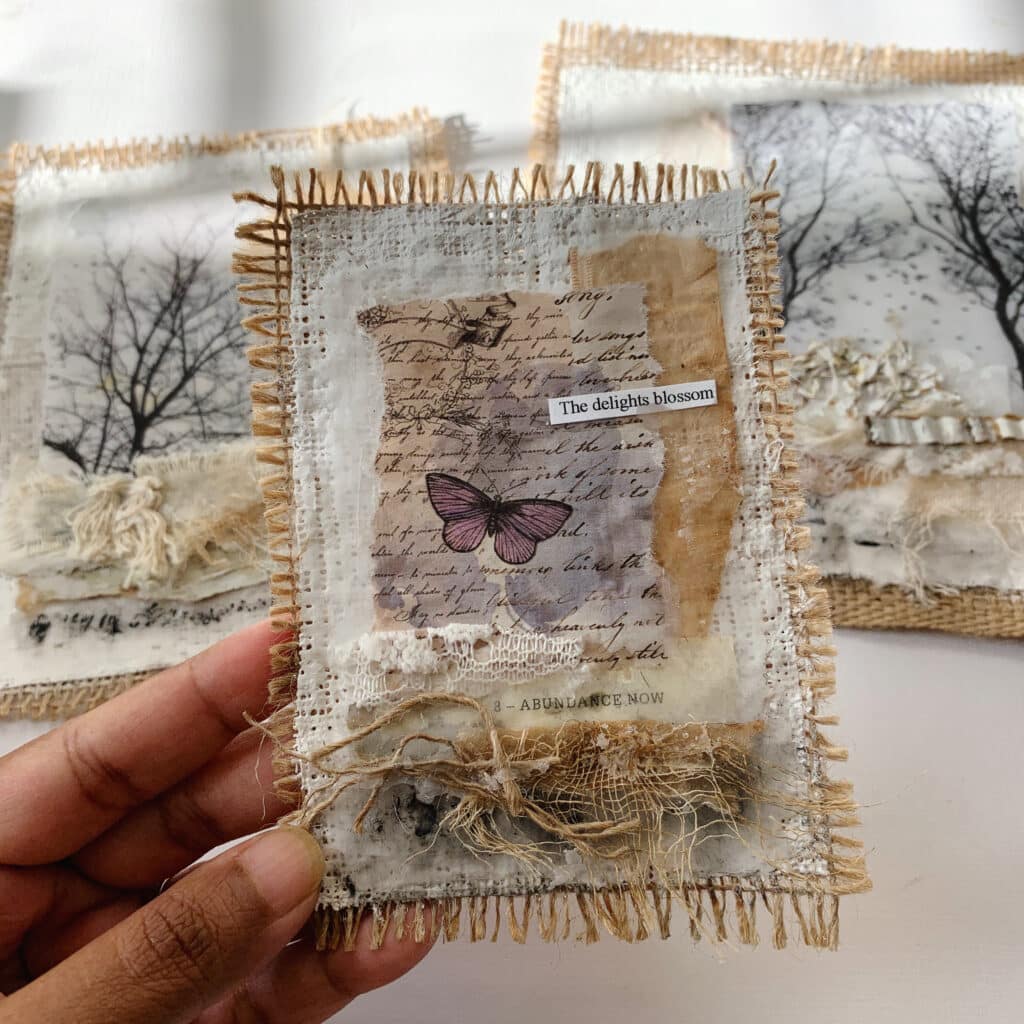
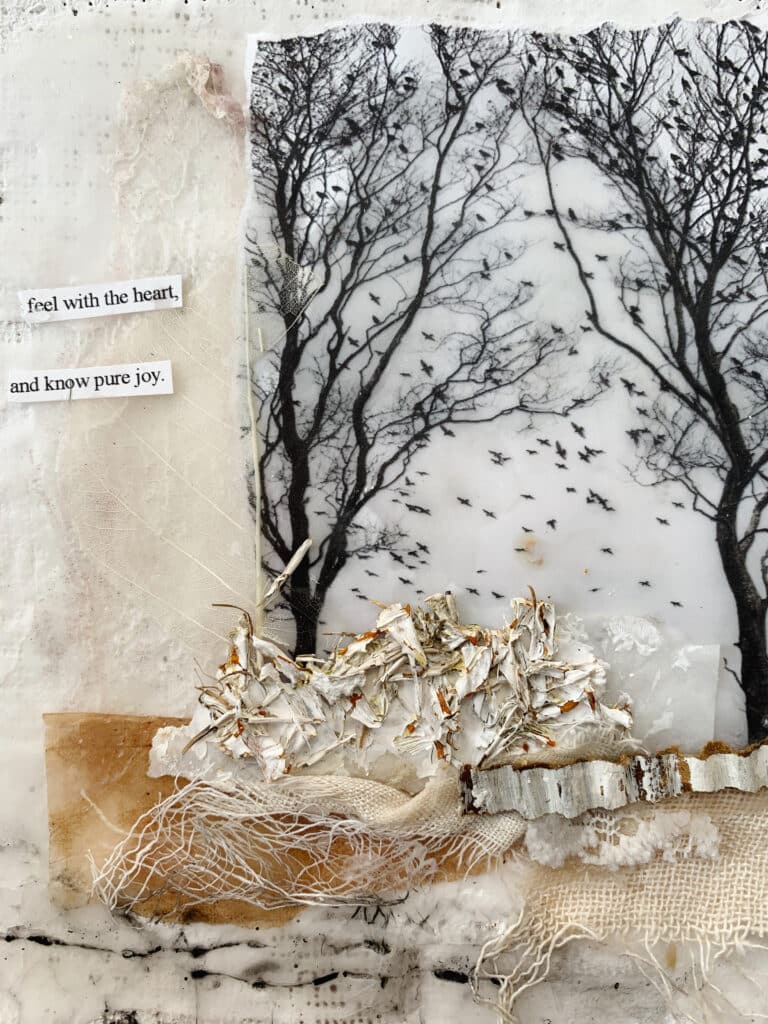
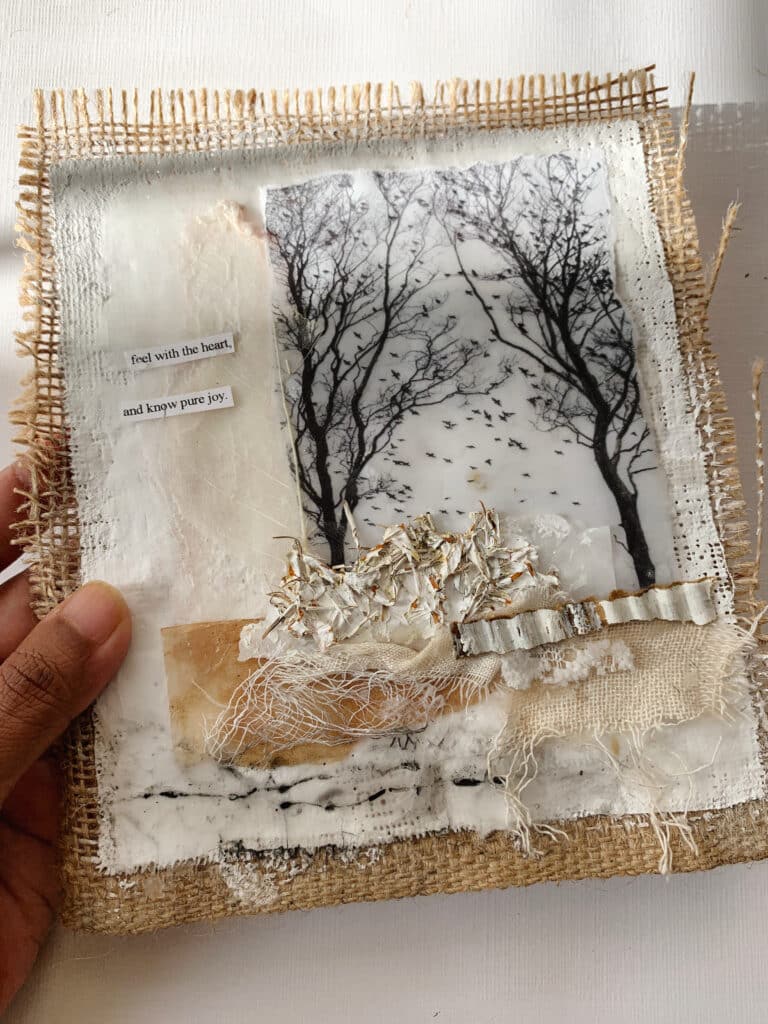
3. Creating the Focal Point
Emotional Focus: Defining Your Message
Process: Choose a focal point that resonates with your theme—trees, perhaps, symbolizing growth or connection. Print or draw this image onto your substrate. You can also layer multiple focal points to create depth—perhaps an image underneath with another transparent or partially visible on top. This layering can signify the complexity of emotions, where no single element fully represents the whole.
Emotional Reflection: Reflect on what this focal point means to you. It’s the heart of your artwork, embodying the central message or emotion you wish to convey.
Additional Ideas:
- Personal Imagery: Use photographs you’ve taken or images that hold personal significance.
- Symbolism: Incorporate symbols or motifs that represent your journey, like a compass for guidance or a bird for freedom.
- Layering Techniques: Use translucent papers to overlay images, adding depth and intrigue to your focal point.

4. Building the Collage Layers
Emotional Focus: Embracing Imperfection
Process: Tear and arrange your collage scraps around the focal point. Experiment with different textures and placements to create an organic and visually balanced composition.
Emotional Reflection: As you tear and arrange the collage materials, let your hands guide the process. Don’t worry about precision—torn edges, uneven layers, and overlapping textures add richness and depth. Embrace the imperfect edges and spontaneous arrangements. This step mirrors life’s unpredictability and the beauty found within it.
Additional Ideas:
- Hidden Messages: Write words or phrases on the base layer before covering them, symbolizing hidden depths.
- Dimensional Elements: Add layers of fabric or thicker materials to create a three-dimensional effect.
- Interactive Components: Include flaps or pockets containing secret notes or small treasures.
5. Sealing with Hot Wax
Emotional Focus: Preserving and Protecting
Process: Apply a layer of hot wax over the substrate. Use the wax as an adhesive to glue your collage pieces, layering them one by one.
Emotional Reflection: Imagine the wax sealing in your emotions and memories, preserving them within the artwork. It’s a protective layer that holds your story together.
Additional Ideas:
- Scented Wax: Incorporate scented candles or essential oils into the wax for a multi-sensory experience.
- Color Tinting: Add pigments to the wax to introduce subtle colors reflecting your emotions.
- Embedded Objects: Press small items like beads, dried herbs, or threads into the wax for added texture and meaning.

6. Adding Fabric Layers
Emotional Focus: Softness & Vulnerability
Process: Layer fabric scraps over the collage, allowing the frayed edges to stay loose, adding softness and movement.
Emotional Reflection: The frayed fabrics symbolize vulnerability and openness. Embrace the raw edges as a representation of authenticity.
Additional Ideas:
- Hand-Dyed Fabrics: Dye your fabrics using natural methods like tea or coffee staining for a personal touch.
- Stitching Details: Add hand-stitched patterns or embroidery to convey care and attention.
- Varied Textures: Mix different types of fabrics—lace, burlap, silk—to explore contrasts between roughness and delicacy.

7. Incorporating Meaningful Words
Emotional Focus: Words from the Heart
Process: Add words or phrases that inspire you. These can be handwritten, printed, or collaged from various sources.
Emotional Reflection: Words have power, especially when they resonate deeply. As you add words to your collage, choose ones that reflect your internal landscape. Let the words you choose speak to your inner truths and aspirations. They serve as a dialogue between you and the viewer, and even with yourself.
Additional Ideas:
- Poetry and Quotes: Incorporate lines from poems, songs, or literature that resonate with you.
- Different Languages: Use words in languages that hold cultural or personal significance.
- Typography Play: Experiment with fonts, sizes, and styles to emphasize certain words or emotions.
- Hidden words: Consider hiding words under layers or tucking them into folds, so that they aren’t immediately visible but can be discovered upon closer inspection. This can represent thoughts or emotions that are often kept hidden.

8. Finishing with Mark-Making
Emotional Focus: Contrast and Clarity
Process: Use a needle tip to scratch into the wax, creating intricate marks. Apply black oil pastel over these areas to highlight the contrasts.
Emotional Reflection: The act of scratching away layers symbolizes uncovering hidden truths or emotions. The contrasting marks represent the complexities of your experiences.
Additional Ideas:
- Layered Mark-Making: Repeat the process of waxing and scratching to build depth.
- Additional Mediums: Introduce charcoal, ink, or metallic paints to enhance textures.
- Personal Symbols: Carve symbols or signs that hold personal meaning, adding another layer of storytelling.


