In this article, we will learn to paint this gorgeous fall painting in a maple leaf, step by step with images and instructions.
If you have access to dried maple leaves, you can paint straight onto it. But since I don’t have any dried leaf, I decided to create my very own maple leaf on acrylic paper and paint it out.
Ok so let’s dive straight into learning how to paint a fall maple leaf.
I used a size 4 flat brush from this flat brush set which is perfect for this canvas size. If you are painting bigger, then switch to a size that is proportionate with your painting surface.
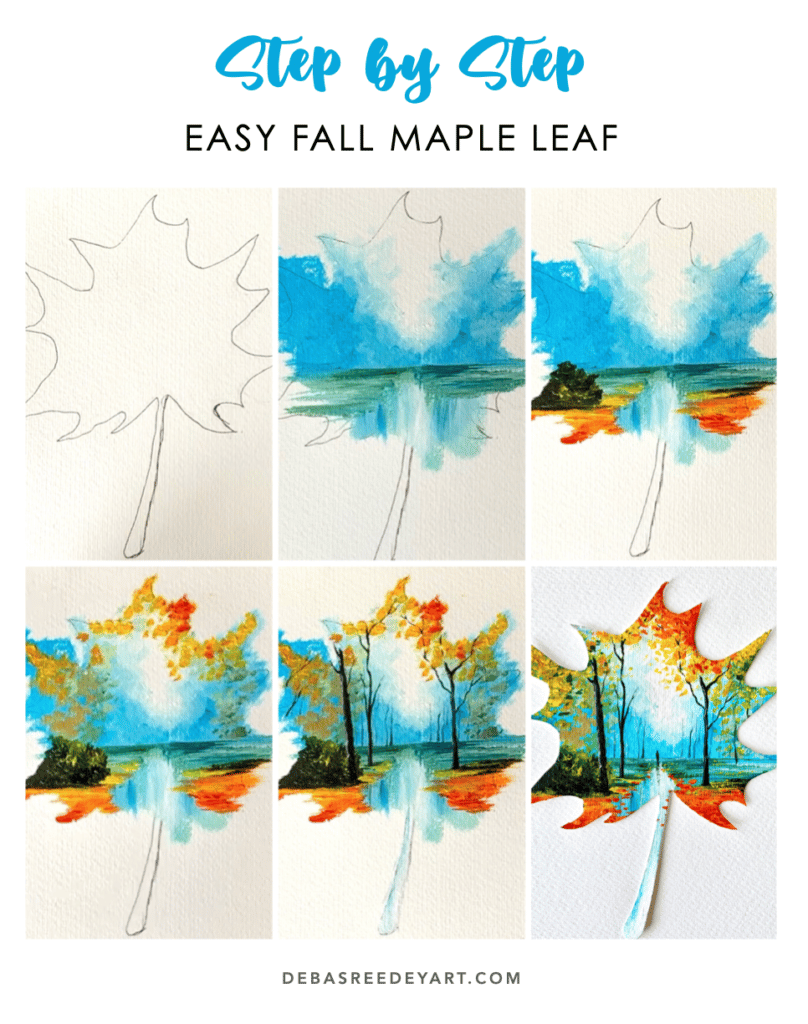
Pin the below image in your Pinterest board for future reference.
painting steps:
1. Sketching the maple leaf
If you are painting on an acrylic paper like me, draw out the maple leaf with a pencil. You can copy the outline from the below image or search for maple leaf outline you may like. I had to erase it a couple of times to get it right 😉
2. Sky
I started with white acrylic paint and gradually blended it with blue to create the gradual shift in the sky color, keeping the centre area lighter than the sides.
3. Lake
After painting the sky, continue the blue & white mixed flat brush on the lake area and create a few vertical strokes that goes in the back. Again keep the center lighter than the sides.
Then pick my green in the same brush and let it mix with blue. And create some horizontal strokes to create the land.
You can see that I’m painting on the maple leaf line, and that’s ok, because later we will cut it off.
4. Fall colors on the ground
Now bring in the fall colors of yellow and orange. In the same technique as in the previous step, add the horizontal strokes of yellow first and then orange. Try blending in some areas, and leave some.
5. Greens
Next add the green area on the left. I used a mix of black and cadmium yellow to create the green bush. Next lighten the color by mixing more yellow and white and add some light leaves strokes on the top. Keep the leaves in the center lighter than the sides.
6. Fall colors on the tree
The same fall colors that we did in the ground earlier, we will start creating them on the tree. Start with a lighter shade of yellow for the background first, and gradually progress to more saturated yellow and orange to create the vibrancy of this painting.
7. Distant trees
Switch to the liner brush and paint the distant trees by mixing blue, white & black. Always remember that you show the perspective of a landscape by creating the distant elements lighter than the foreground.
8. Big trees
Once the distant trees are done, paint the more prominent trees in the front with black. Create some branches through the fall leaves. If you cant paint through, add some leaf colors on top.
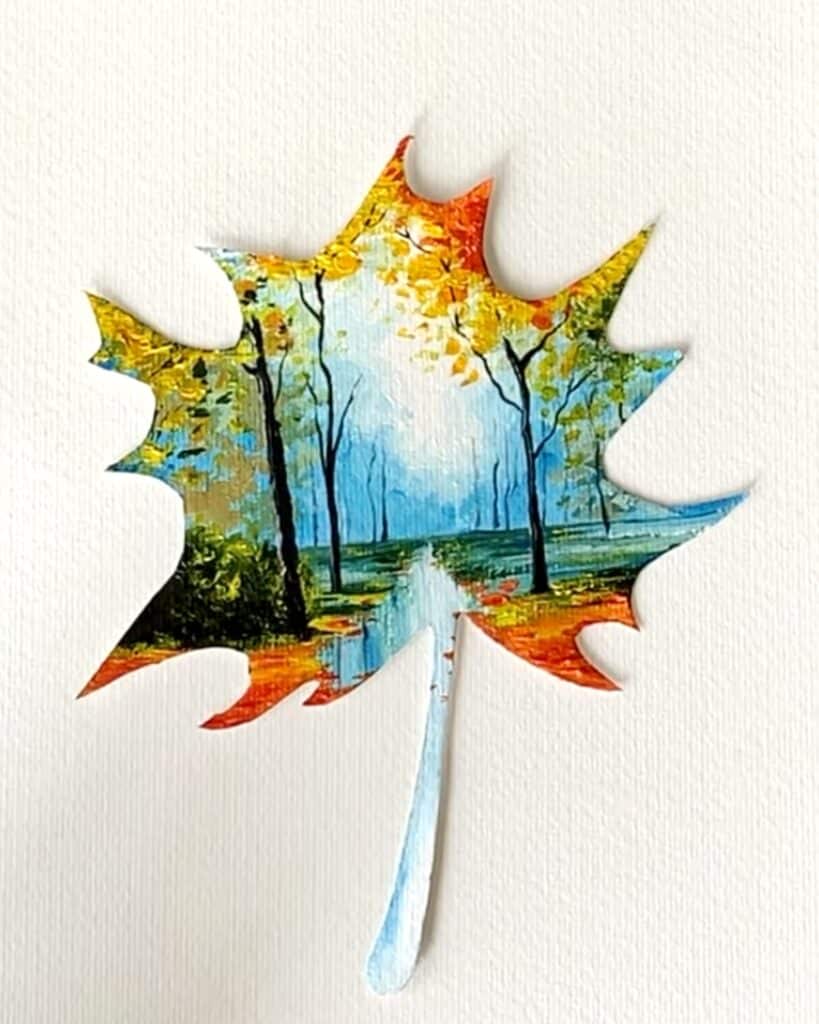
9. Cut the maple
This is a good time to cut out the paper because all the colors on the sides are done.
Grab a scissor and cut it along the lines carefully. Before cutting, I drew the lines once becasue it wasn’t visible much.
10. Border touch ups
Once you have cut the maple leaf, add some colors on the edges where you feel the lines are showing. I also added a touch up of crimson red to the fall colors to give more vibrancy to the painting.
11. The Human
And now the final addition to the painting. Add a small human in the centre of the maple leaf. Don’t go into detailed anatomy but just create a vertical line and add a small dot on top for the head. And then add a small shadow below.
And that’s it… just by following these 11 steps, you can now create your very own maple leaf painting.
Did you enjoy following this tutorial? What is the next painting you want me to teach? Let me know how it turned out for you by commenting below!
Happy Painting!
Pin the below image in your Pinterest board for future reference.