Let us learn to create this gorgeous winter creek acrylic painting step by step with photos and a video.
I know this looks like a complicated painting, and I get this question a lot – “How to break down a complicated painting into simpler steps?” Keeping that in mind, let’s dive into learning this winter creek acrylic painting, where you will learn how to start painting the different layers of a landscape, starting with the farthest layer first, and gradually progressing to the front.
Master the Art of Snowy Pine Trees & capture Winter landscapes with ease
The Snowy Pines Masterclassis your complete guide to mastering snowy pine trees and creating breathtaking winter landscapes, covering 11+ hours of instruction and inspiration!
Master snowy pine trees: Learn to paint 9 unique styles using 4 different brushes
Perfect your winter landscapes: Create 10 stunning projects
“This class has been a game-changer for me. I’ve tried painting pine trees before, but they never turned out right. Now, thanks to Debasree’s tips, I can finally create the winter scenes I’ve always wanted.” — Priya S.
I used a size 6 flat brush from this flat brush set which is perfect for this canvas size. If you are painting bigger, then switch to a size that is proportionate with your painting surface.
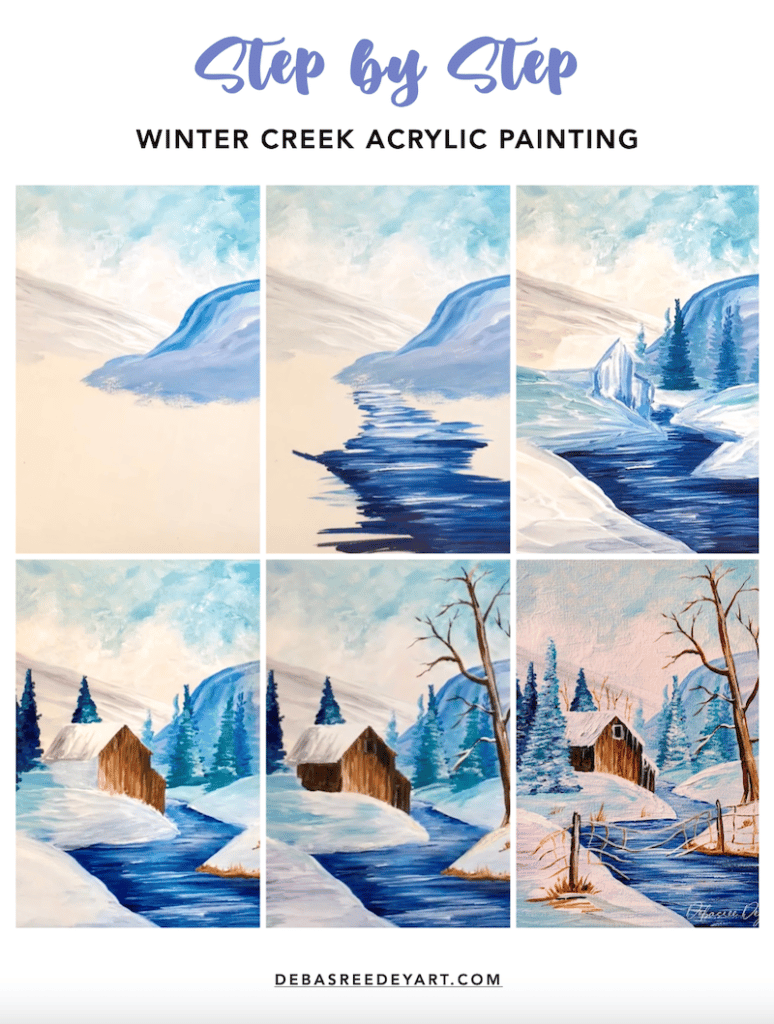
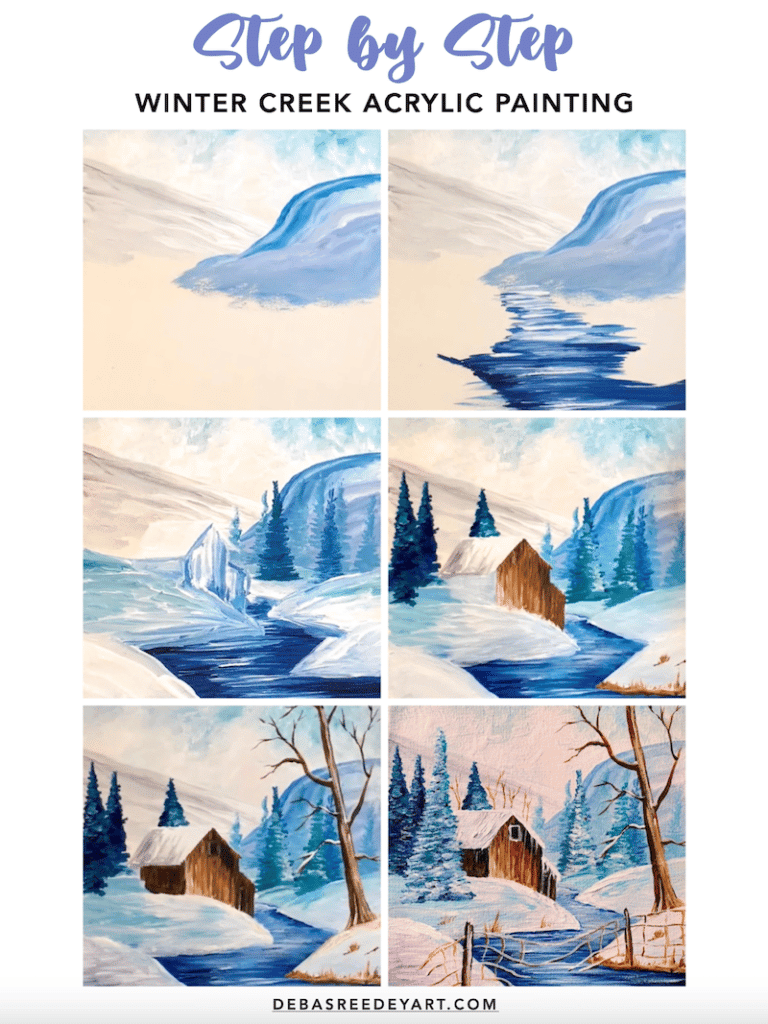
We start painting this winter creek acrylic painting by creating the first 3 layers of the landscape, starting with the sky first.
Layer 1: Start with white + teal blue to color the sky. Blend it random.
Layer 2: Add the left mountain with white & black mix.. add some textures with white while coloring.
Layer 3: Add the right mountain with blue & white first, and then blend in some purple. Again add more white to create some mountain textures.
2. the creek
Use horizontal strokes with the flat tip of your flat brush and go left-right continuously. Start with blue and white on the top and as you move down, add more raw prussian blue which is quite dark, along with some purple.
Then add some white horizontal strokes on top of the dark blue and purple to create water lines and mark out the creek edge roughly just to understand the path of the creek flowing. Let little bit go extra on the sides, we will cover it up with white later.
3. right snow land + distant pine trees
Add the white land on the right using white, and then mix some teal blue on the top and blend in with the white.
Add some distant pine trees using the flat brush techniques keeping the foliages straight. First with very light shades of blue for the distant pine trees, and then with a little darker shade of blue for the front ones.
4. left snow land + cabin outline
Similarly add the snow land on the left. First add the distant one (the one on the top) and then add the front one going over the distant one.
This is how you create the value and depth in a landscape by adding the distant layer first, preferably with a lighter color and then the front layer with a different shade of color.
Now mark out the cabin. I used the flat brush to draw out the roof. It was easier 0 just with 2 strokes u can create the whole roof. And then switch to a round brush and draw out the walls.
5. more snow pine trees
Now add more snow pine trees around the cabin using the same flat brush technique.
Btw check out how to paint perfect snowy pine tree with acrylics, that will enhance your skills to paint snowy pine trees confidently in any winter landscape.
6. cabin walls
Now start painting the cabin wall using brown and white mix. I used vertical strokes here, but horizontal strokes are also fine.
7. cabin wall shadows + the front snow land
Add shadows to the wall by mixing the brown with black to create the form and the dimension of the cabin – a good contrast between highlights and shadows.
Here I also added some purple to the snow land in the front along with white.
8. tree trunk and its branches
Now add the tree trunk with a small round brush along with its branches. Make sure to use a fine liner brush with a pointed tip to create the narrow branches. I used the same colors as the cabin walls – a mix of brown, white and black to create the 3 dimensional look.
Also add some small grasses on the land using the same color combo.
9. big snow pine + broken fence
Finally, add the big snow pine tree in front of the cabin. Here you can create foliages up or foliages down pattern also, whichever you like. I painted the foliages straight.
Here you can create any other snowy pine tree using a filbert brush or a fan brush. I’ve taught various types of snowy pine trees in this online class, so you can have your pick 😉
And finally add the broken fence. First with black and brown, and then add a touch of white.
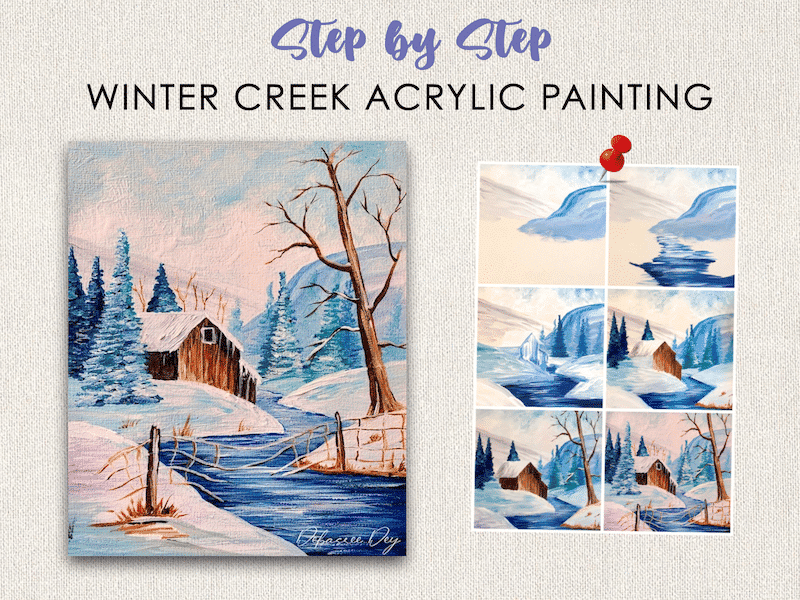
And that’s it… just by following these 10 steps, you can now created your very own winter creek acrylic painting with snowy pine trees and a winter cabin.
Did you enjoy following this tutorial? What is the next painting you want me to teach? Let me know how it turned out for you by commenting below!
Happy Painting!
Pin the below image in your Pinterest board for future reference!